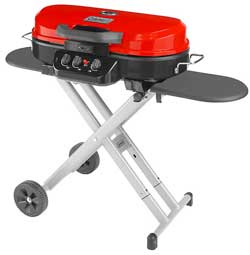
The Coleman RoadTrip Grill uses a standard propane connector, so it’s super easy to attach it to a propane tank. Let’s connect gas to your RoadTrip Grill, shall we?

The Coleman Roadtrip Grill Propane Connector makes the job so easy that you’ll feel like a pro. Simply attach the grill’s regulator hose to the tank’s valve and ensure a secure connection. I’ll guide you through the process…
Connect Your RoadTrip Grill to Propane Using an Adapter Hose:
Materials You’ll Need:
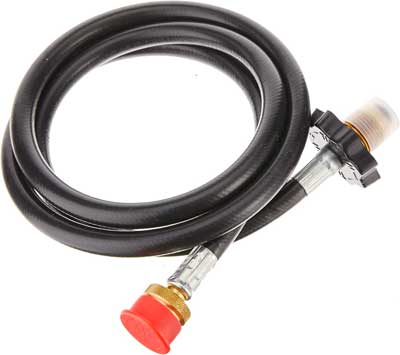
- A Coleman High-Pressure Propane Gas Hose and Adapter.
- Your RoadTrip Grill (285, LXE, Xcursion).
- A bit of elbow grease (figuratively speaking).
1. Gather Your Gas Connecting Gear
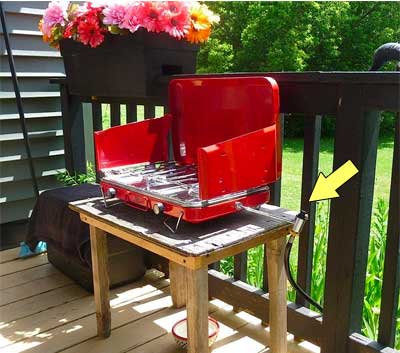
Unpack your hose and adapter kit. Then, make sure your grill is in prime grilling position and ready for a new buddy.
2. Let’s Get Adapter Happy
- Locate the end of the gas hose that’s waving the adapter proudly.
- It’s like a puzzle piece, so align it with the adapter port on your grill. They should become fast friends in a snap.
3. Time to Connect Your Grill to the Propane Tank
- With a firm hand, push the adapter into the grill’s port until it’s snug as a bug in a rug.
- No need to break a sweat, but a little muscle doesn’t hurt.
4. Turn Up the Gas Flow
- Now, it’s time to connect the other end of your hose to your propane tank.
- Give it a gentle clockwise twist to lock it in. Remember, righty-tighty!
- Not too tight, though – we’re aiming for secure, not Hercules-level strength.
5. Tighten the Hose Nut
- Use your wrench to gently tighten the hose nut, securing that connection to the propane tank.
- Don’t overdo it; just make it snug enough to keep things cozy.
6. Leak Test, the Detective Work
- First, mix a soapy solution in a spray bottle – our trusty gas leak detective.
- Second, turn on the propane tank’s valve, and it’s time for the bubble show.
- Next, spray the soapy solution over all connections, especially around the adapter and hose.
- Then, keep an eye out for bubbles. If you spot any, it’s the gas leak’s version of a telltale sign.
Step 7: Fire It Up!
- If there are no bubble trouble, you’re ready to grill.
- Fire up your grill, and let the culinary magic begin!
There you go, you’ve attached the propane gas hose and adapter to your RoadTrip Grill like a seasoned pro.
How to Replace a RoadTrip Grill Regulator:
 If you need to switch out the stove pressure regulator, here’s the part for about $22. Don’t worry, it’s easy to install yourself. And just in case you want it, here’s a quick tutorial to replace/install a new regulator on your Grill…
Materials You’ll Need:
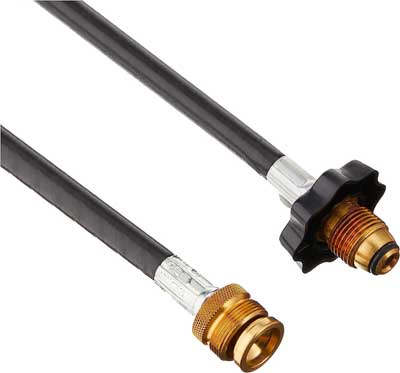
- Your new RoadTrip Grill Regulator.
- An adjustable wrench or pliers (the grill surgeon’s tools).
- Leak-detection solution (soapy water, your trusty sidekick).
- A replacement hose, if needed.
Step 1: Safety Precautions
Before we dive into the world of grill surgery, make sure your grill is off, and both the propane tank and regulator are disconnected. Safety first, folks!
Step 2: Bid Farewell to the Old Regulator
- Spot the old regulator, where it’s clinging to the propane tank like an old friend.
- Give it a gentle twist with your trusty adjustable wrench or pliers. (Counter-clockwise)
- The regulator will reluctantly let go. Carefully remove it along with the hose.
Step 3: A Quick Check-Up
Examine the hose and regulator closely. Any cracks, wear, or tears? If so, they’re due for a retirement party.
Step 4: A Regulator Makeover
- Introduce your grill to the new regulator – make sure it’s a perfect match, like a matchmaker for gas.
- Use your trusty adjustable wrench or pliers to secure the connection. Righty-tighty, but don’t overdo it.
Step 5: Bubble Trouble? Not on Our Watch!
- Mix up a bubbly solution of soapy water.
- Turn on the propane tank’s valve, and now comes the fun part.
- Spray the soapy concoction on the connection points – that’s where the magic happens.
- Keep an eagle eye out for bubbles. If you spot ’em, you’ve uncovered a gas leak.
- If you detect a leak, shut off the propane valve, disconnect the regulator and revisit the connections. Call in the pros, if needed.
Step 6: The Grand Reunion
- When all is well in grill-land, reintroduce the regulator and hose to the propane tank.
- Connect it snugly, but no need for a Hercules-style grip.
- Turn on the propane tank’s valve – it’s showtime!
- Ignite the grill and watch those flames dance in harmony.
Voilà! You’ve aced the regulator replacement like a true grill master. Remember, safety and satisfaction always take center stage. Grill on!